vendredi 6 juin 2014

Fée Steampunk fin du projet

Suite du Wip et fin du projet !
Après un temps de pause assez long ... deux mois  , à l'approche du concours organisé par mon club , le Paintdémonium , j'ai finalement repris le projet  pour terminer la figurine et le décor afin de l'intégrer dans mon "display" pour le concours.
Voila le projet fini:

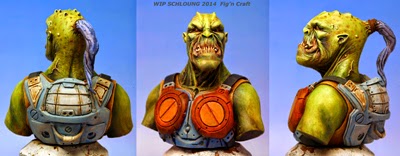
WIP, and end of the project !
After a long break ... two months , at the approach of the contest organized by my club, "Paintdémonium" , I finally returned to the project to finish the figure and setting in order to integrate it into my display for the contest.
Here is the finished version:


Mais revoyons la scène au ralenti ;-)

Let's have a flash back !


Début du traitement du décor : après une sous couche noire,  vieillissement, texture , rouille ...

Beginning of the scenery treatment : after a black under layer, aging, texture, rust ...


Effet rouille , avec méthode du gros sel pour donner un effet peinture écaillée , associé a une peinture à l'aérographe .

Rust effect with coarse salt method to give an effect of peeling paint, combined ton airbrushed painting.


Le mur de brique est peint , les effets d'usures terminés ! et les 2 aiguilles du cadran de l'horloge sont en place à l’arrière !
Le décor est prêt à accueillir la figurine :
Voyons où elle en est !?

Brick wall is painted, the effects of wear are over! and the 2 needles of the dial of the clock are placed at the back !
The scenery is ready to receive the figure.
What's about the figure ?? 


La progression est lente ....la peinture laborieuse ...les chaussures et le gant sont en cours , le chapeau et les collants sont au stade de la sous-couche ...et la peau aussi !

Progress is slow ....the painting is laborius ... the shoes and the glove are ongoing ,
hat and tights are at the stage of the underlayer ... skin too!
 

On progresse.. mais on est loin du résultat final escompté !
Painting progresses ... but we are far from the expected final result!


Et voila aprés pas mal d'hésitations , et de doutes quand au bon choix de la figurine , le résultat final:

And after a lot of hesitation and doubts for the right choice of the model, here is the final result:


Et bien finalement j'ai pu terminer pour le concours ! Je ne suis pas satisfait du chapeau ...et de petites choses par ci par là , j'aurais voulu rajouter quelques petits détails sur le décor mais le temps m'a manqué avant de la présenter au "Paintdemonium" .
Dans l'ensemble le résultat est satisfaisant ...ce n'était pas ridicule au milieu de mon display !
Pour fignoler il faudrait faire quelques retouches , mais je crois que je vais en rester là et passer au projet suivant !
Cette fée Steampunk m'a déjà pris assez de temps ! à la suite :-)

Well finally I was able to finish for the contest!
I am not satisfied with the painting of the hat ... and some things here and there ...
I wanted to add a few details on the scenery but time ran out before I submit it to the "Paintdemonium".
On the whole the result is not too bad  ... it was not ridiculous in the middle of my display!
To perfect I should make some adjustments, but I think I'll leave it at this stage and go to next project!
This Steampunk fairy has already taken me enough time! Next project !  :-)


jeudi 3 avril 2014

Buste Space Hunter ... Alien bust

Enfin un nouvel article !
 ... en fait je suis un peu en panne d'inspiration sur la peinture de la figurine "fée steampunk" , ou plus simplement j'ai le sentiment que le décor est trop bien pour la figurine ...du coup je n'avance pas !
Alors pour me changer les idées , j'ai ressorti des placards une figurine spécialement éditée pour le concours de figurine "Paintdémonium 2013" : un buste style SF sculpté par un camarade Gregory Laden !.. il est fort le garçon  ;-)
...Une belle bête , pas très romantique ni très portée sur la broderie ... mais ce grand gaillard a bien une maman ...alors ...:-)

At last a new article!
Actually ... I have been a bit out of inspiration for painting the figure "steampunk fairy", or more simply I feel that the decor is too good for the figure ... So I don't progress :-\
So to change my mind (yes , yes I have a brain ) , I took out of the drawers a figure specially edited for the competition model "Paintdémonium 2013" : SF style bust sculpted by a fellow Gregory Laden! .. high level the guy ;-)
A beautiful beast, not very romantic or very focused on embroidery ... but this big fellow has a mom ... then ... :-)

Voila le résultat :
Result : 


Vous allez me dire , pour un extra terrestre vert c'est pas très original ... moi j'aime bien !
Et voici en image quelques étapes du processus de réalisation ! pour info c'est mon premier buste à ce niveau de finition.

You will tell me , for an alien , green is not very original ... I do like it!
And here are in picture the stages of achievement! this is my first bust at this level of finish.

Au départ, la figurine est sous couchée et légèrement ombrée , et la queue de cheval refaite :
Initially, the model is under coated and lightly shaded, and the ponytail redone :


je commence par la peau :
I start with the skin :


Puis début de recherche des couleurs du plastron ...
Then start looking for the plastron colours ...

On progresse ...
Work in progress...


les couleurs se précisent !
Coloured pattern becomes clear in my mind !

 
On se rapproche du but !
It is closer to the final goal !


On augmente l'effet de vieillissement , le contraste global , on insiste sur le point
focal : les partie éclairées du visage ...

I increase the aging effect and  the overall contrast , I emphasized the focus point of the illuminated part of the face ...

Jusqu'a la version finie :
Until the finished version:


Et voila !


jeudi 30 janvier 2014

Fée Steampunk ou Steampunk Faerie WIP n°2

Hé oui de retour , je dépoussière le blog  qui en a besoin : je l'ai un peu abandonné ces derniers temps !
Voila une petite avancée du projet "steampunk faerie" , plus d'images que de lecture , mais quelques explications quand même !
Le décors progresse , il est passé par une phase : je fais,  je défais, je refais ...pour au bout du compte  en arriver à la version finale (à quelques détails prés) . Il faut maintenant le peindre et lui donner un aspect vieilli , anciens , patiné ! ... ce sera la prochaine étape !


Yep the come back ! I dust the blog which needs it : I gave it up a bit those last days !
Here is a small project progress "steampunk faerie", more images than reading, but some explanation anyway !
The set is progressing, it passed through a stage : I do, I undo, I do again ... to arrive at the final version (a few details remaining). Now I have to paint it and give it an aged appearance, old, weathered! ... this is the next step!


 Résultat peu concluant ! donc on reprend tout et on refait .. mais différemment !
... et oui parfois il faut s'y reprendre à plusieurs fois avant d'obtenir le résultat espéré

Inconclusive result ! then start from the beginning .. but differently :-)  indeed
sometimes you have to take it several times to get the result you expected.


On arrive à quelque chose de correct ! évidement ça dépasse ... le cutter est notre ami ! il ne reste plus qu'à rajouter certains détails et à préparer la mise en couleur avec une sous-couche noire .

The result is quite good , some parts need to be cut :the cutter is our friend ;-)...mind your fingers !
It only remains to add details and undercoat in black .
 

Et que se passe t'il avec la figurine ??
A l'écoute de certains commentaires j'ai décidé de lui rajouter un accessoire plus symbolique du style steampunk : des lunettes ou "google" .
J'ai donc du les fabriquer en Fimo et fil de cuivre, ce fut pour moi une première de réaliser un accessoire aussi petit ! ...le résultat manque un peu de finesse mais est tout de même satisfaisant .

what's going on with the figure ??
Listening to some comments I decided to add her a symbolic steampunk style accessory : glasses or "google". So I had to make it in Fimo and copper wire, it was a first for me to achieve such a small device !
The result lacks a bit of fineness but still satisfactory.


Voilà pour l'instant la suite au prochain épisode !
Voilà for the moment ...To be continued!

lundi 30 décembre 2013

snowman in winter! Pixar tribute ... ou mon premier bonhomme de neige en Fimo

Mieux vaut tard que jamais , voici une petite contribution pour célébrer l'hiver :
C'est mon premier bonhomme de neige en Fimo , inspiré du célèbre "knick knack" de chez Pixar, j'adore ce court métrage !
Voila c'est un "post éclair"  , mais histoire de vous souhaiter de bonnes fêtes de fin d'année !


Better late than never, here is a small contribution to celebrate the winter :
This is my first snowman in Fimo, inspired by the famous "Knick Knack" from Pixar,I love this short !
Tis is a "post flash" a little bit short , but I wish you  a merry Christmas season!


Ok promis le prochain post sera plus conséquent :-)
Ok promised the next post will be more substantial :-)

mercredi 20 novembre 2013

Boite en bois décorée ..du craft !

Bienvenue sur mon pti blog !
Pour cet épisode cela sera orienté "craft"  et plus précisément : comment j'ai customisé une boite en bois grâce à une Kokeshi en bois peinte ... mais pas  que !

Hi there ! welcome on my little blog  :-)
This time , we are going to talk about "Craft" , and more specifically the customization of a wooden box with a painted wooden kokeshi !


La boite étant vouée à voyager vers le Portugal pour l'anniversaire de Rita,  fan de Kokeshi ,  la thématique de customisation était évidente , "Japan style"  :-)

D'abord il y eu une kokechie en bois ...sujet en découpe laser vierge de toutes couleurs , à moi de lui insufler  la vie avec mes pinceaux.. ou du moins d’essayer  :-)

Le procédé reste classique : ponçage au papier trés fin pour préparer la surface , sous couche acrylique blanche à la bombe pour une bonne lisibilité ,  boucher les pores du bois et une bonne accroche de la peinture . Pour cette fois je vais utiliser la peinture à l'huile mieux adaptée pour ce support et  la taille respectable du sujet (par rapport à mes figurines habituelles).
Aprés un bon séchage de la sous-couche , je dessine les motifs au crayon à papier , et il ne reste plus qu'à sortir les pinceaux et les tubes de peinture !
La suite en image :


The box was destined to travel to Portugal for the birthday of Rita ,fan of kokeshi, the theme of customization was obvious, "Japan style" :-)

First there was a wooden ... kokechie subject in laser cutting, virgin of any color, now I have to give  her life with my brushes ... well , I will try :-)

The process is classic: to sand with very thin paper to prepare the surface, to apply a layer of white acrylic in spray to increase the details , to clog the wood pores and improve the grip of the paint . This time I used oil painting, best suited for this support and  the large size of the subject (compare to my usual figures ).
After a good drying of the underlay, I draw patterns with a pencil, and let's get brushes and tubes of paint!
The rest in pictures:


... A ce stade refaire les yeux et les lèvres semble une évidence ! ...

 ... At this step .. to redo the eyes and lips seems obvious ! ...


Voilà après séchage complet , une couche de vernis satiné est passée à la bombe pour protéger la peinture .
Et pendant ce temps que devient la boite ?
Comme tout sujet en bois , elle est poncée , apprêtée en blanc , légèrement égrainée pour la préparer à la peinture de décoration ( une bonne préparation c'est 50% du travail fait !)

Voilà, Once completely dry, a layer of satin varnish is sprayed to protect the paint.
And during that time, what happened to the box ?
As for the kokeshi, the box is sanded, primed in white, slightly sanded again to prepare for the decoration painting (a good preparation is half work done!)


On passe à la peinture , avec un rose clair à l'acrylique:

Acrylic painting in light pink :


Puis, on agrémente avec de petits motifs floraux très simples rappelant certains motifs de papier japonais, tout en réservant un espace pour placer la kokeshi peinte.

Then, decorating with small simple floral patterns ( reminding of some Japanese papers,) without forgiving to reserve a space to place the kokeshi.

Il ne reste plus qu'à vernir légèrement la boite , à coller de la feutrine à sa base et à fixer la kokeshi !

It only remains to slightly varnish the box, to glue the felt at the bottom and to set the kokeshi!


Et voila une boite personnalisée !
J’espère qu'elle  aura fait plaisir à l'heureuse propriétaire  :-) en tout cas moi je me suis bien amusé à la faire !
Merci de votre visite ! à bientôt pour une autre aventure ...

A customized box is born !
I hope it sent a smile to the new owner :-) 
Anyway it has been a pleasure to do it
Thank you for your visit! see you soon for another adventure ...

vendredi 1 novembre 2013

Fée Steampunk WIP


Bienvenue pour de nouvelles aventures sur Fig'n Craft , cette fois ci nous allons explorer l’univers du « Steampunk » grâce à une petite figurine de la marque Freebooter .
C'est une petite fée version « punk » des années « Victoriennes» ...univers à la Jules Verne , où la technologie à vapeur aurait pris le dessus sur la technologie pétrolifère bref allez voir pour plus d'info !

 Welcome to new adventures on Fig'n Craft, this time we will explore the world of "Steampunk" with a small figurine of Freebooter brand.
 It is a little fairy  "punk" version of the "Victorian" years ...in the  Jules Verne universe , in which steam technology have taken precedence over the oil technology! brief let's go here to more informations.


Voilà la petite :
 Here is the little fairy :


 Les ailes ne seront collées qu’après la mise en couleur .La fée est sous-couchée en blanc , les ailes ont déjà subit un lavis pour faire resortir les détails.
... n'est t'elle pas mimi avec ses godillots et son haut de forme ;-)

 The wings will be glued after the coloring . The fairy is undercoated in white  but there's already a wash drawing on the wings to highlight the details .
Isn't she cute with her boots and top hat ?? ;-)

Qui dit "Steampunk" dit décors style industriel , avec certains éléments codifiés comme des engrenages , des tuyaux , du métal ...etc 
Voila quelques croquis préparatoires qui m'ont aidé à mettre en place le décors :

 Who says "Steampunk" means industrial style decor, with some elements coded as gears, pipes, metal ... and so on
 Here are some preliminary sketches that helped me to put up the decorations:


C'est l'idéal pour utiliser de la carte plastique , et ma boite à « bricoles » ...une base carrée , un mur de briques formé en patte « époxy » , un fond ajouré en courbe ...la base est en place . Il faut maintenant l'habiller , et y inclure les éléments symboliques du « steampunk »
C'est là que la boite à bricoles avec ses pignons et autres éléments de récupération me vient en aide !


This project is perfect for using the plastic card, and my 'odds and ends' box !
A square base, a brick wall sculpted in epoxy putty , an opened background in curve  ... the base is established.
Now, we have to dress up, and include symbolic elements of the "steampunk"


Après quelques essais et différentes configurations on arrive au résultat suivant :
Évidement ce n'est pas le stade final , il reste beaucoup de choses à faire !
Certains éléments ne seront rajoutés qu’après la mise en peinture, tel les petits pignons récupérés d'un mécanisme de montre .

After a few tries, we get the following configuration, which will be retained!
Obviously there is still much work to do.

Some items will be added after the painting, such as small gears from an old watch mechanism.


 Voilà une vue sur le socle en bois:
 A view of the wooden base.


La suite au prochain épisode !
More coming soon !

dimanche 13 octobre 2013

Champignon à tendance écossaise ! ... Scottish mushroom

Bon ben voila , l'été est fini et l'automne arrive avec ses feuilles mortes , le vent , la pluie , l'été indien , les marrons , les châtaignes , les glands ??? enfin ça y'en a toute l'année ... et ses champignons :-)
Voila donc en images les étapes d'une "customisation" d'un champignon en bois , du commerce ... non celui la n'a pas été ramassé en forêt ! 

The summer is over and autumn arrives with its dead leaves , wind,  rain, the Indian summer, chestnuts, acorns... and fungi :-)
 So here are the steps of the customization of a wood mushroom ...indeed it hasn't been picked up in the forest !


L'idée qui me fut proposée par ma chère et tendre était de décorer le champignon avec un motif de tartan écossais , bonne idée et bon entraînement !
En réalité, ce qui m'a pris le plus de temps c'est de trouver les bonnes couleurs et les associer tel un vrai tartan écossais ! ...voila le résultat du motif à reproduire sur le champignon :

The idea which  was suggested to me by my other half was to decorate the mushroom with a tartan pattern! Good idea and good training !
In fact , what took me most time was to find the right colours and associate them as a real Scottish tartan ! ...
here is the result of a pattern to paint on the mushroom:


La suite en image , pas besoin de blabla !
Next steps in pictures , no need for explanation !


et voila !

Au final une fine couche de vernis satiné pour protéger la peinture acrylique.
In the end a thin layer of satin varnish to protect the acrylic paint.

Happy crafting everyone  ;-)